

Table of Contents
Intro
A lot of us may have a ton of Amazon Dash buttons lying around because back in the day, they used to mean $5 off any product shipped and sold by Amazon. Since then, you may have sold your spent buttons on eBay or harvested them for the Duracell AA battery inside.
But if you still have some left…here’s a fun little beginner’s project where you can repurpose the button to add a line to a Google Sheet whenever you press it. The use case for me today is to record whenever I insert/remove my contact lenses, to track wearing time. I’ve also seen people set one up to record whenever their baby poops and they change the diaper. To each their own…
FYI: these instructions are for Mac OSX. It’s adaptable to other systems, but I won’t go into that today.
Preparation
We’ll be using Nekmo’s amazon-dash script for this project, specifically the instructions for Mac. I’m rewriting the instructions below in a more beginner-friendly language, so hopefully you can do this even if you don’t think you are very tech savvy. Macs come with Python 2.7 installed, and that is what this script runs on. If you run into any errors, it may be due to something wrong with your Python configuration, so we’d have to troubleshoot that separately.
- Open Terminal on Mac.
- To do so, I like to use Spotlight: press Cmd+Spacebar to bring up a little textbox in the middle of your screen. Start typing the word terminal, and press Enter as soon as you see Terminal.app appear.
- In Terminal, copy and paste in (press enter after you paste this whole command in): sudo pip install https://github.com/Nekmo/amazon-dash/archive/develop.zip
- It will ask you for your computer password first, so enter that and press enter. You won’t see anything being entered as you type your password. Don’t panic, this is normal. Just type your password, and press enter.
- Now it will download and install the amazon-dash app.
- Once installed, copy and paste in (press enter afterwards): sudo amazon-dash discovery
- It should say:
Welcome to Amazon-dash v1.3.1 using Python 2.7.10
The discovery command lists the devices that are connected in your network. Each device will only be listed once. After executing this command wait approximately 10 seconds before pressing the Amazon Dash button. After pressing the button, the Mac address of the button will immediately appear on the screen. Remember the address to be able to create the configuration file.
- It should say:
- Wait about 10 seconds, and then press the button on your Dash Button.
- Within a few seconds after your Dash Button fails to buy anything, you will see some magenta text on your screen. It should look something like this “69:55:fd:3e:cf:32 (Amazon Device)“. You may also see other text that don’t say “(Amazon Device)” next to them; you can ignore those. The random gibberish with the semicolons is called the MAC address.
- Copy and paste the MAC address before “(Amazon Device)” and keep it somewhere safe.
- Now press Ctrl+C on your keyboard to exit this discovery process.
Set Up IFTTT
- Go to your web browser and navigate to https://ifttt.com/maker_webhooks .
- Set up an IFTTT account if you don’t have one already, then return to this page, enable the webhook, and click on the button in the top right called “Documentation”.
- Copy and paste the alphanumeric key in really big letters to the place where you saved the MAC address of your Dash button.
- Still on IFTTT’s website, click in the top right corner on your username, and click “New Applet” on the dropdown menu.
- Click the +this and type in “Webhooks” on the next screen. Select the big blue button that says “Webhooks”.
- On the next screen, click the big blue button again that says “Receive a web request”.
- On the next screen, type in a name you want to give to your button, like “contactlenses” (remember this name for later). Click the Create Trigger button.
- On the next screen, click the +that and type in “Sheets” on the next screen. click on “Google Sheets”. (You may need to connect to your Google Sheets account if you’ve never done this before)
- On the next screen, click the “Add row to spreadsheet” button.
- On the next screen, fill out Spreadsheet Name (i.e. “Contact Lens Wearing Time Log”). You can delete “||| Value 2 ||| Value 3” from the Formatted row, and leave the rest the same. Click “Create action”.
Configuring the script
- Now go back to your Terminal window. Copy and paste this command and press enter: cd /etc
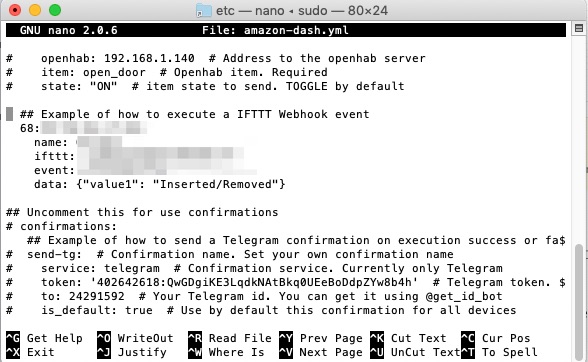
- Copy and paste this command and press enter: sudo nano amazon-dash.yml
- Use your keyboard arrow key to get down to where it says “## Example of how to execute a IFTTT Webhook event”
- Change the text after name: to whatever you want, like “name: contact lens”
- Delete and replace the MAC address that’s already there with the MAC address of the Amazon Dash button you discovered earlier and saved.
- Delete and replace the key after ifttt: with your own IFTTT key.
- Change the name of the event: to the name you had used on the IFTTT applet, such as “contactlenses”.
- After data: {“value1”:, type in what you want to be recorded on the Google Sheet after the date and time. Like “Inserted/Removed” (of contact lenses).
- Once you’re done, delete the “#” symbols from the beginning of each line that you edited. Result should look like this:
- Press Ctrl+X to exit, it’ll ask if you want to save, so press Y, and then press Enter to save it as the same filename. You should now be back to the original window.
Finishing up and running the app
- Copy and paste the following commands, pressing Enter after each command:
- chown root amazon-dash.yml
- sudo chmod 600 amazon-dash.yml (may require computer password)
- sudo amazon-dash (may require computer password)
- If all was successful, you should see the following message pop up:
Welcome to Amazon-dash v1.3.1 using Python 2.7.10
Listening for events. Amazon-dash will execute the events associated with the registered buttons. - Press your Dash button. The window won’t seem to do anything or say anything, but go to your Google Drive and see if you see a new row. If you did, congratulations! You successfully hacked your Dash button!!
- You’ll need to leave this window running, so best to set this up on a computer or device that is always on.
Let me know in the comments if you have success with these instructions, or if you have another project you would like to share with us! If you have any suggestions on how I can improve my circles and arrows, let me know as well. Enjoy!
Similar Projects
https://blog.cloudstitch.com/how-i-hacked-amazon-s-5-wifi-button-to-track-baby-data-794214b0bdd8
https://alexmeub.com/hacking-amazon-dash-buttons/
https://www.hackster.io/ravi-sawhney/amazon-dash-reminder-app-79e6bb
[…] Repurposing Amazon Dash buttons to add a line to Google Sheet when pressed […]